Seamless Integration & Connectivity - MuleSoft's Box Connector

Introduction
MuleSoft's Box Connector bridges the gap between the Anypoint Platform and Box, providing organizations with a unified integration solution. Facilitating seamless connectivity, this integration ensures efficient data exchange across applications. Real-time updates and flexible configurations enhance adaptability, allowing businesses to synchronize and access Box content effortlessly. The connector optimizes workflows, reducing manual efforts and boosting overall productivity.
By streamlining collaboration and data synchronization, MuleSoft's integration empowers enterprises to harness the full potential of their Box accounts within a cohesive and interconnected digital environment. This collaborative approach promotes operational efficiency, data accuracy, and a more streamlined digital experience for businesses embracing the integration of MuleSoft and Box.
Here are eight key features and services that MuleSoft- Box Connector integration brings to the table:
- Effortless Connectivity: MuleSoft's Box Connector facilitates seamless connectivity, acting as a bridge between diverse applications and Box, ensuring smooth communication and streamlined data exchange.
- Unified Data Flow: Achieve a unified and efficient data flow between applications and Box, enhancing collaboration and ensuring that information seamlessly traverses your digital ecosystem.
- Real-time Collaboration: Enable real-time collaboration by orchestrating communication between applications and Box, ensuring that data is synchronized instantaneously for up-to-date information.
- Versatile Connectivity Patterns: Benefit from MuleSoft's flexibility, supporting diverse connectivity patterns, data formats, and structures. This adaptability ensures compatibility with various data sources and destinations.
- Scalability and Performance: Leverage the robust architecture of MuleSoft and Box Connector for scalability, ensuring optimized performance even with expanding data volumes and horizontal scaling.
- Data Transformation and Refinement: MuleSoft empowers organizations to transform and refine data during integration, ensuring that data exchanged with Box meets specific business requirements.
- Security and Compliance: Adhere to stringent security measures for secure data transmission between MuleSoft and Box, ensuring compliance with industry standards and safeguarding sensitive information.
- Error Handling and Logging: Utilize MuleSoft's comprehensive error handling mechanisms and detailed logging capabilities to identify and resolve issues efficiently, optimizing the integration process.
- Agile Development and Deployment: Leverage MuleSoft's intuitive design and visual development environment for rapid integration flow development and deployment. This agility allows organizations to adapt quickly to changing business needs with reduced time-to-market.
In the realm of integration, the MuleSoft-Box Connector collaboration provides a robust suite of features, ensuring organizations achieve a seamlessly connected, scalable and secure digital ecosystem.
Potential use cases for integrating Box Connector with MuleSoft
- Unified E-commerce Content Management
- Enhanced CRM Document Collaboration
- Effortless IoT Data Storage and Collaboration
- Secure Healthcare Information Systems Integration
- Streamlined Financial Document Management
- Improved Supply Chain Document Visibility
- Efficient HR Document Management with HRIS
- Centralized Social Media Analytics
Integrating Box Connector Using MuleSoft
Box Connector Account Creation:
Step1: To create a Box Connector account, begin by registering at https://account.box.com/login. Click on sign up
Step2: Click on Get Started
Step 3: Need to fill Information for signing up and Need to add credit card or debit card details.

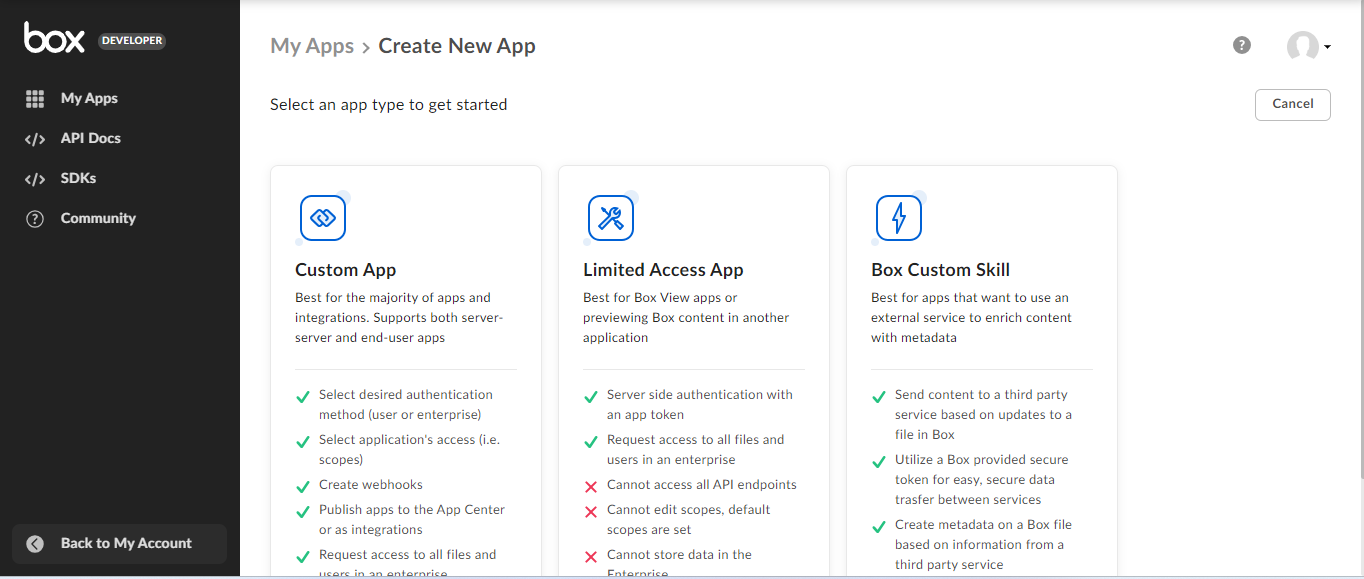
Step 4: Now it will redirect to below mentioned page and then click on dev console.
Step 5: Now it will redirect to below mentioned page link https://app.box.com/developers/console. Click on Create New App.

Step 6: Click on Custom App
Step 7: Fill required details to create app.

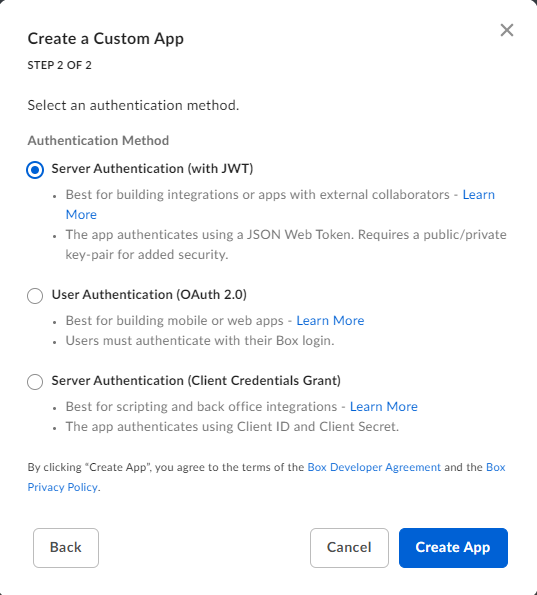
Step 8: By selecting authentication method and here I am choosing with server authentication(with JWT).
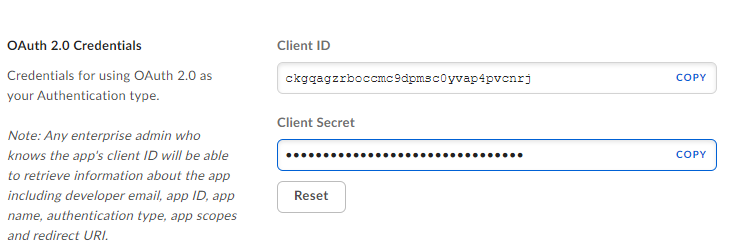
Step 9: Once your custom app is created, go to the "Configuration" tab. Copy the "OAuth 2.0 Credentials," including the Client ID and Client Secret. These credentials are crucial for secure configurations, enabling authentication processes in the application. Save these details for future use in establishing secure connections and access to associated services.
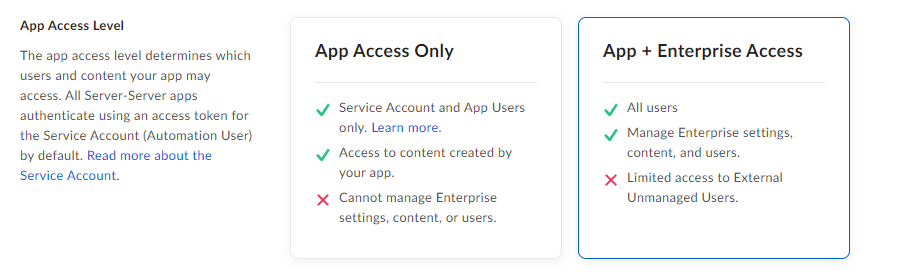
Step 10: Choose "App + Enterprise Access" in the App Access Level section for broader permissions and enhanced interaction with enterprise resources.
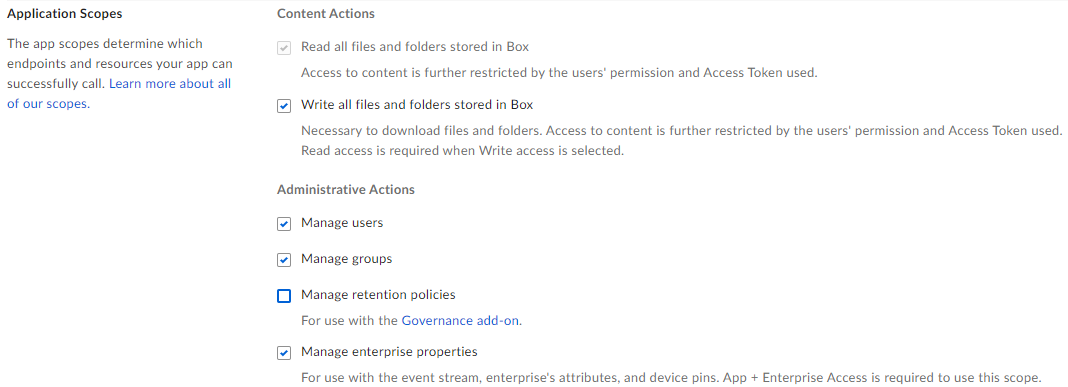
Step 11: Specify scopes (Read, Write, Manage Users, Manage Groups, Manage Enterprise Properties) as shown in the image in the "Application Scopes" section.
Step 12: Click on Add a Public Key.
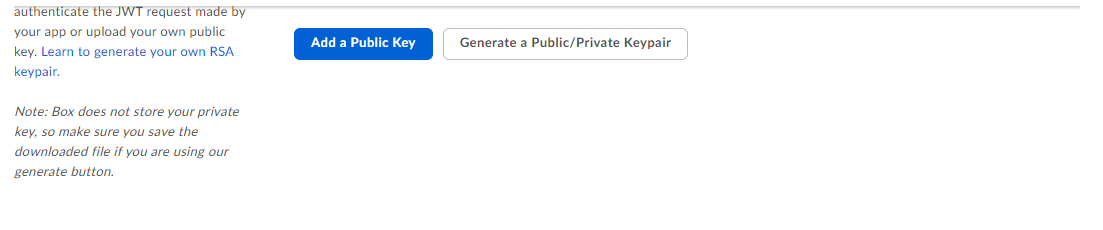
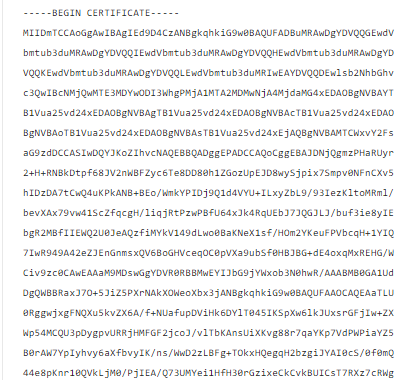
Step 13: Add the public certificate information to the "Public Key" textbox. Create a Keystore using the provided command in CMD for secure key management.
keytool -genkeypair -keystore mulesoft-box-keystore.jks -dname "CN=localhost, OU=Unknown, O=Unknown, L=Unknown, ST=Unknown, C=Unknown" -keypass pass1234 -storepass pass1234 -keyalg RSA -sigalg SHA1withRSA -keysize 2048 -alias mule-box -ext SAN=DNS:localhost,IP:127.0.0.1 -validity 9999


File will be created as mentioned above.
Step 14: After creating the Keystore, extract the public certificate using the provided command:
keytool -exportcert -alias mule-box -keystore mulesoft-box-keystore.jks -rfc -file public.cert


Step 15: Public.cert File will be created. Open the "public.cert" file with Notepad. Copy its content and paste it into the designated textbox in Box's configuration. Verify the information and save the configuration.
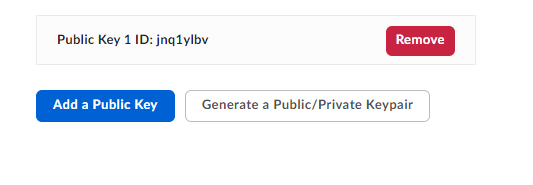
Step 16: Public key will be generated.
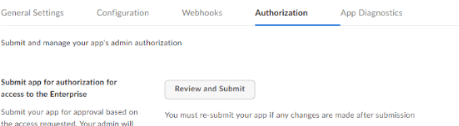
Step 17: Navigate to the "Authorization" tab, select "Review and Submit". Enter the "App Description", submit, and await an email confirmation after the process is completed.
Create Mule Projects
Create a mule project in Anypoint studio.
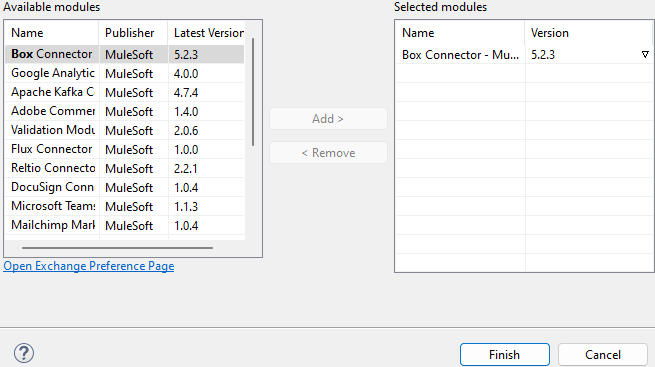
Integrate the "Box Connector" into your Mule Palette by searching for it on the exchange. Download and add it to your project for seamless connectivity.
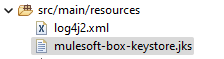
Include the "mulesoft-box-keystore.jks" file, generated earlier, into the src/main/resources folder of your project for proper configuration.
Configuring Box Connector With JWT
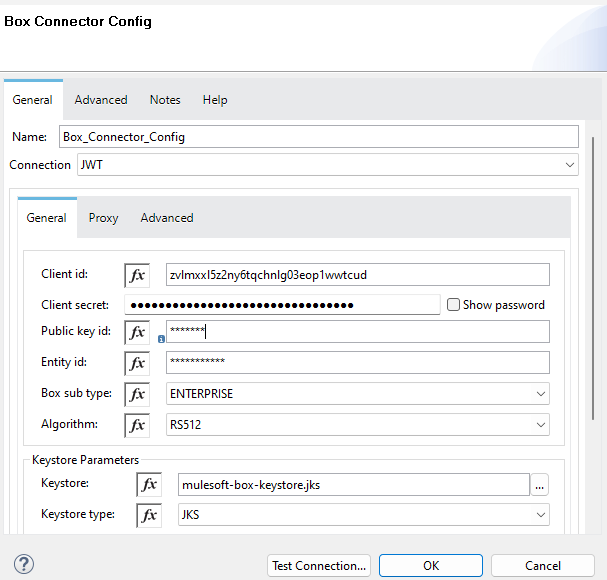
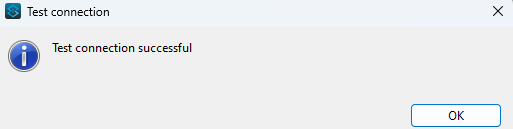
Configure the Box Connector with JWT by entering the previously copied Client ID and Client Secret. Use the Public Key ID from the "Configuration" tab in Box, where the public certificate info was added. For "Entity ID", if you choose "Box sub type" as "ENTERPRISE", retrieve the enterprise ID from Box's "General Settings" tab. Validate the connection by clicking "Test Connection" for a successful setup.
In this proof of concept (POC), once the Mule application is executed, deposit the file into the designated folder within Box to showcase the functionality and demonstrate how the integration works.
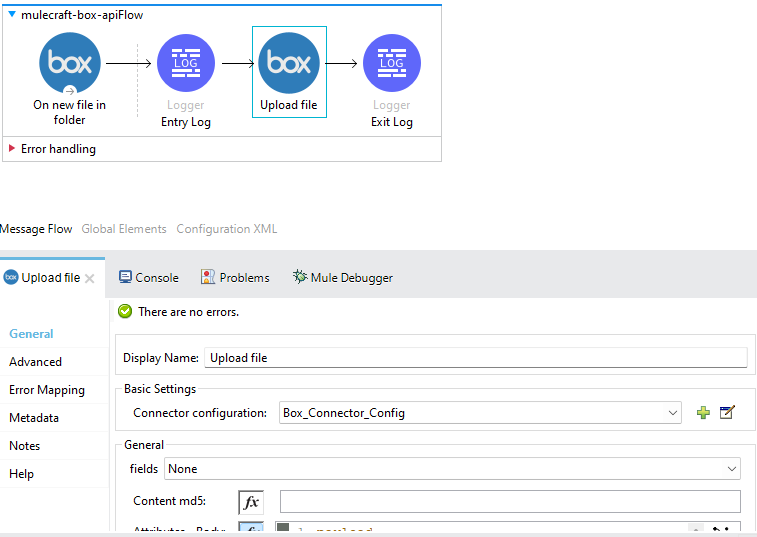
Upload File
Utilize the connector to upload the file to Box. This functionality ensures seamless integration and efficient file management within the specified Box location.
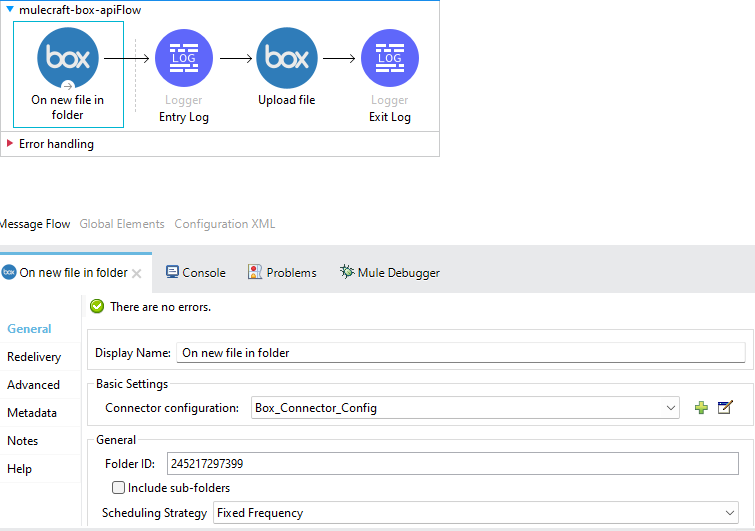
Configure the "Folder ID" to specify the target folder where the connector should search for new files. This identification is crucial for the system to recognize and process files placed in the designated folder.
On new file in folder: Position the connector in the source section, enabling it to trigger automatically when a new file is added to the specified folder within Box. This setup ensures that the connector responds dynamically to incoming files, initiating the desired actions as defined in the integration flow.
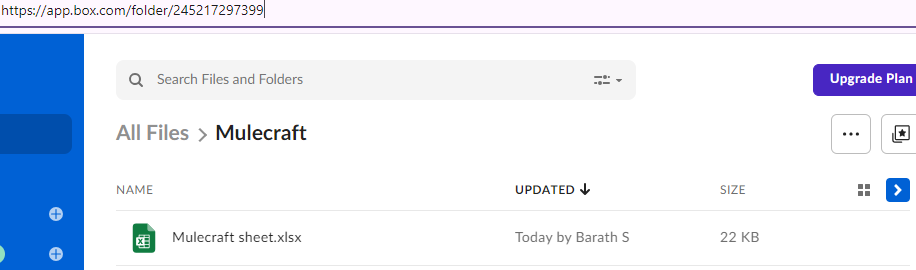
The response for the new file "Mulecraft sheet.xlsx" uploaded to Box would be:
{
"created_at": "2024-01-21T09:00:00Z",
"modified_at": "2024-01-21T09:00:00Z",
"id": "1421117980555",
"name": "Mulecraft sheet.xlsx",
"event_type": "ITEM_UPLOAD"
}
In the Attributes section of the request body, provide a JSON object with the file name and folder ID to specify where the file should be uploaded. The structure would be as shown below.
{
"name": " Mulecraft sheet.xlsx ",
"parent": {
"id": "245217297"
}
}
For the file body, include the raw data within the file. The body should encapsulate the binary content of the file. The specific structure and content depend on the API or endpoint, typically involving multipart/form-data with correct Content-Disposition, Content-Type, and the actual binary file data. Adjust the structure based on the API's requirements.
Conclusion
Note: Additional connectors will be featured in the upcoming blog post. Stay tuned for further integration insights and expanded capabilities in the next installment.
In conclusion, MuleSoft's Box Connector enables seamless integration, streamlining connectivity with effortless precision. This dynamic synergy fosters efficient data exchange, empowering organizations to optimize workflows, enhance collaboration, and unlock the full potential of Box's content management capabilities within a unified digital ecosystem.