Steps to Convert a Flat File into JSON / CSV / XML
Data integration often involves dealing with flat files, such as text or delimited files. To enable seamless communication between systems, converting these flat files into structured formats like JSON, CSV, and XML is essential.
MuleSoft, with its powerful DataWeave language and flexible integration capabilities, simplifies these tasks. In this blog, we'll guide you through the steps to read a flat file and convert it into various structured formats.
Flat files are a common format for exchanging data, but they often require transformation into more structured formats like JSON, CSV, or XML for processing. MuleSoft provides an easy way to perform these transformations using DataWeave and built-in components.
Prerequisites
- MuleSoft Anypoint Studio - Anypoint Studio 7.4 and Mule Runtime version 4.2.2
- Basic knowledge of Mule Flows and DataWeave
Flat File: (Also known as “FlatFile,” “FFD File,” or Flat-File”) A Flat File is data in a plain text format. Usually we get this kind of data from either mainframe systems, SFTP, or Files.
Copybook: A copybook is a selection of code that defines data structures. If a particular data structure is used in many programs, then instead of writing the same data structure again, we can use copybooks. In general terms, to define the fields Data Types/Length and their structure, we define them in a copybook which in turn helps us in generating FFD files using a Transform Message.
Step 1: Creating the copybook
1234SRAVAN 27-09-1992TELANGANA HYDERABAD 11111
5678LINGAM 07-02-1996USA CHICAGO 77777
Flat File contains 98 characters with spaces (Let us later discuss why spaces are also considered). Remember the Flat File always has FIXED length! Each row has 49 characters defined and they are divided by a new line.
In the example, the data we getting from SFTP or Mainframe basically contains the following information:
'BIRTHID', 'BIRTHNAME', 'BIRTHDATE', 'BIRTHSTATE','BIRTHCITY', 'BIRTHZIP'
If BIRTHNAME defined for the length of 10 characters and if name has only 6 characters, then the remaining 4 characters MUST be 4 empty spaces.
Below is the copybook that created to define incoming fields:
000000 01 BIRTH-DETAILS.
000100 05 BIRTHID PIC X(4).
000200 05 BIRTHNAME PIC X(10).
000300 05 BIRTHDATE PIC X(10).
000400 05 BIRTHSTATE PIC X(10).
000500 05 BIRTHCITY PIC X(10).
000600 05 BIRTHZIP PIC X(5).
Save this file with extension .cpy, e.g., BirthDetails.cpy.
Step 2: Auto-generating the FFD file using DataWeave:
We basically need an FFD file to convert the Flat File to JSON or CSV.
- Drag-and-Drop the Transform Message component in an empty flow.
- Go to the Input section and click on Define Metadata.
- Click on Add and give some Type Id.
- Select Copybook from the Type drop-down.
- Click Import and select the copybook that you have created in Step 1.
- Finally, click Select.
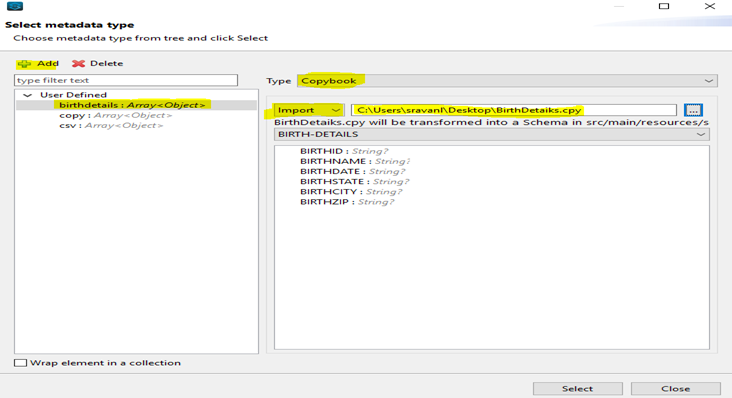
Clicking on Select, an FFD file will be created automatically and placed under src/main/resources > schemas > BirthDetails.ffd
Copy the FFD from the schemas folder and paste it inside src/main/resources as shown.
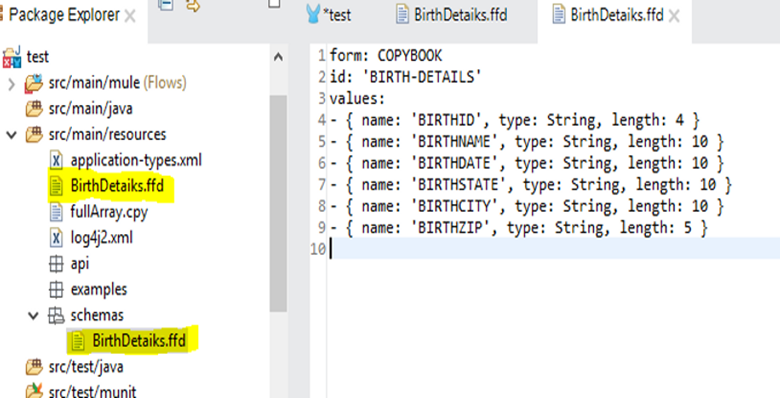
FFD file generated will look as given below.
Form: COPYBOOK
id: 'BIRTH-DETAILS'
Values:
- { name: 'BIRTHID', type: String, length: 4 }
- { name: 'BIRTHNAME', type: String, length: 10 }
- { name: 'BIRTHDATE', type: String, length: 10 }
- { name: 'BIRTHSTATE', type: String, length: 10 }
- { name: 'BIRTHCITY', type: String, length: 10 }
- { name: 'BIRTHZIP', type: String, length: 5 }
Step 3: Final Transformation:
Whether it’s a File Read connector or an HTTP Listener, the first thing to place after the source is a Set Payload component. Drag-and-Drop a Set Payload component and go to the MIME Type tab to configure recordTerminator and schemaPath.
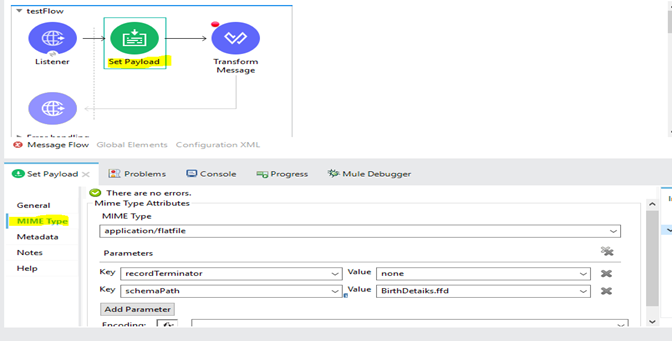
Place a Transform Message connector after the Set Payload.
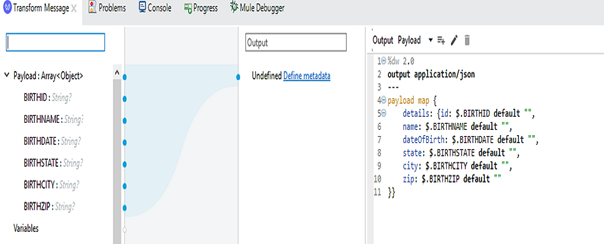
If you need output in a CSV format, just replace application/json with application/csv.
If you need output in XML format, we need another Transform Message after application/json output because this doesn't have a root tag. If you try to map directly to application/xml, it will throw an error.
We have 4 spaces appended at the end. This is because for each row, we defined the FFD file with the following rules:
- First 4 characters belong to Birth ID
- Next 10 characters belong to Birth Name
- Next 10 characters belong to Birth Date
- And so on...
Each special character is treated as 1 character. The rows must be divided using a new line break (highlighted in yellow). If you can see the input, the State name for the second row is USA (3 characters). So we have appended 7 spaces to it to make it a perfect and valid Flat File.
Pass the Flat File data through Postman using a POST Method and select the type as Text. Send it as input for your Application.

Final Mule application.

More Ways Step 1: Create a Mule Project
- Open Anypoint Studio and create a new Mule project.
- Name the project, e.g.,
FlatFileConverter. - Click Finish to set up your workspace.
Step 2: Add Components for File Handling
- Drag and drop a File Connector (Read) onto the canvas.
- Configure it to read a sample flat file by setting the path to the file.
- Add a Transform Message component to handle data conversion.
Example Flat File (data.txt)
sqlCopyEditname,age,city John,25,New York Emma,30,San Francisco
Step 3: Convert Flat File to JSON
DataWeave Code for JSON Conversion:
dwCopyEdit%dw 2.0
output application/json
var header = payload[0] as String splitBy ","
---
payload[1 to -1] map ((line) ->
(line as String splitBy ",") mapObject ((item, index) ->
(header[index]): item
)
)
This code reads the flat file, splits it by commas, and maps the header fields to JSON keys.
Output:
jsonCopyEdit[
{
"name": "John",
"age": "25",
"city": "New York"
},
{
"name": "Emma",
"age": "30",
"city": "San Francisco"
}
]
Step 4: Convert Flat File to CSV
DataWeave Code for CSV Conversion:
dwCopyEdit%dw 2.0
output application/csv
var header = payload[0] as String splitBy ","
---
payload[1 to -1] map ((line) ->
line as String splitBy ","
)
This transformation outputs the data in a clean CSV format.
Step 5: Convert Flat File to XML
DataWeave Code for XML Conversion:
dwCopyEdit%dw 2.0
output application/xml
var header = payload[0] as String splitBy ","
---
root: {
records: payload[1 to -1] map ((line) ->
{
record: (header map ((key, index) ->
(key): ((line as String splitBy ",")[index])
))
}
)
}
Output:
xmlCopyEdit<root>
<records>
<record>
<name>John</name>
<age>25</age>
<city>New York</city>
</record>
<record>
<name>Emma</name>
<age>30</age>
<city>San Francisco</city>
</record>
</records>
</root>
Step 6: Run the Mule Application
- Save and deploy your Mule flow.
- Verify the output in JSON, CSV, and XML formats by checking the console or file outputs.
Conclusion
Converting flat files into JSON, CSV, or XML is straightforward in MuleSoft with the help of DataWeave and connectors. By following these steps, you can build robust integrations to transform and process flat files with ease.